Showing posts with label illamasqua. Show all posts

Monday, 2 February 2015

Matte flakies

Hi,
Today I'll show you another easy to do tape manicure. I started with two coats of Illamasqua - Taint on all nails and after it completely dried, I placed some scotch tape so as to create the V at the base of each nail. I applied Sweet Color flakies nail polish from Born Pretty store - you can find it here on their website; it's shade #4. Also check out this old post of mine to see more beautiful swatches of it. Finally, I removed the tape while the polish was still wet and finished with Flormar's Matifying top coat. What do you think?


Follow me on:

Wednesday, 31 December 2014

Happy New Year 2015!

Hi,
Today I'll show you the manicure I'm going to wear for this New Year's eve. I wanted something simple, but eye-catchy, so just went for glitter. I used Marsala as the base colour for my manicure, as it was chosen by Pantone to be the colour of the year 2015. The nail polishes used were Illamasqua - Vice and Sephora by OPI - Come to Pappa-razzi!. I applied the glitter using a sponge to maximize its effect and applied matte top coat over it. What do you think?

Happy New Year!


Follow me on:

Sunday, 11 May 2014

Pin-up nail art

Hi,
Today I'll show you my first pin-up manicure. I have to say that Gia Makeup Blog was my main source of inspiration. After seeing her beautiful cherry nails and her posts about pin-up, 
I knew I had to do them!
I started with a coat of Oriflame -Night fever and after it dried completely, I applied some round french stickers like these here and applied two coats of Illamasqua -Alarm. I removed the stickers before the nail polish dried. Then I created some dots and lines using white nail polish and the brushes and dotting tools set from Born Pretty store. 
On my accent nail, I started with two coats of white (Flormar -M01) and then I stamped the cherry design from Cheeky Beauty's GA16 stamping plate. I finished with Golden Rose -Matte Top coat on all nails, but didn't apply it over the black part.
What do you think?


I attached the two pictures below so you can better see that the reverse french is shiny, while the rest of the design is matte. To achieve this effect, I used Golden Rose -Matte Top coat.


Nu uitati ca puteti achizitiona ojele Golden Rose si online, de pe Cosmania.ro. Urmariti pagina de facebook Golden Rose Romania pentru a fi la curent cu toate noutatile.

Sunday, 29 December 2013

Colour of the Year 2014: Radiant Orchid Nail Art

Hi,
Today I'll show you a manicure I saw in a cutepolish's video and which I liked so much that I decided to recreate it colour with colour. It's inspired by Radiant Orchid, which is the colour of the following year.

I started with two coats of Rimmel -312 Ultra Violet and white it was still wet, I applied a strike of Illamasqua -Vice, and one of China Glaze -Too Yacht To Handle. Using a toothpick, I created the dry marble. I finished with clear top coat. What do you think?

Saturday, 30 November 2013

Getting ready for Christmas Challenge: 1. Not yet, but almost!

Hi,
Today I'll show you the first manicure I created for Christmas 2013. I decided to take part in an awesome challenge created by Elsa from Like a candy shop. There will be 10 different manicures, as listed below. Anyone can take part in it and the good part is that there's no schedule - anyone posts when they want! Hope you'll have the courage to enter, too. You will find more details on her blog.


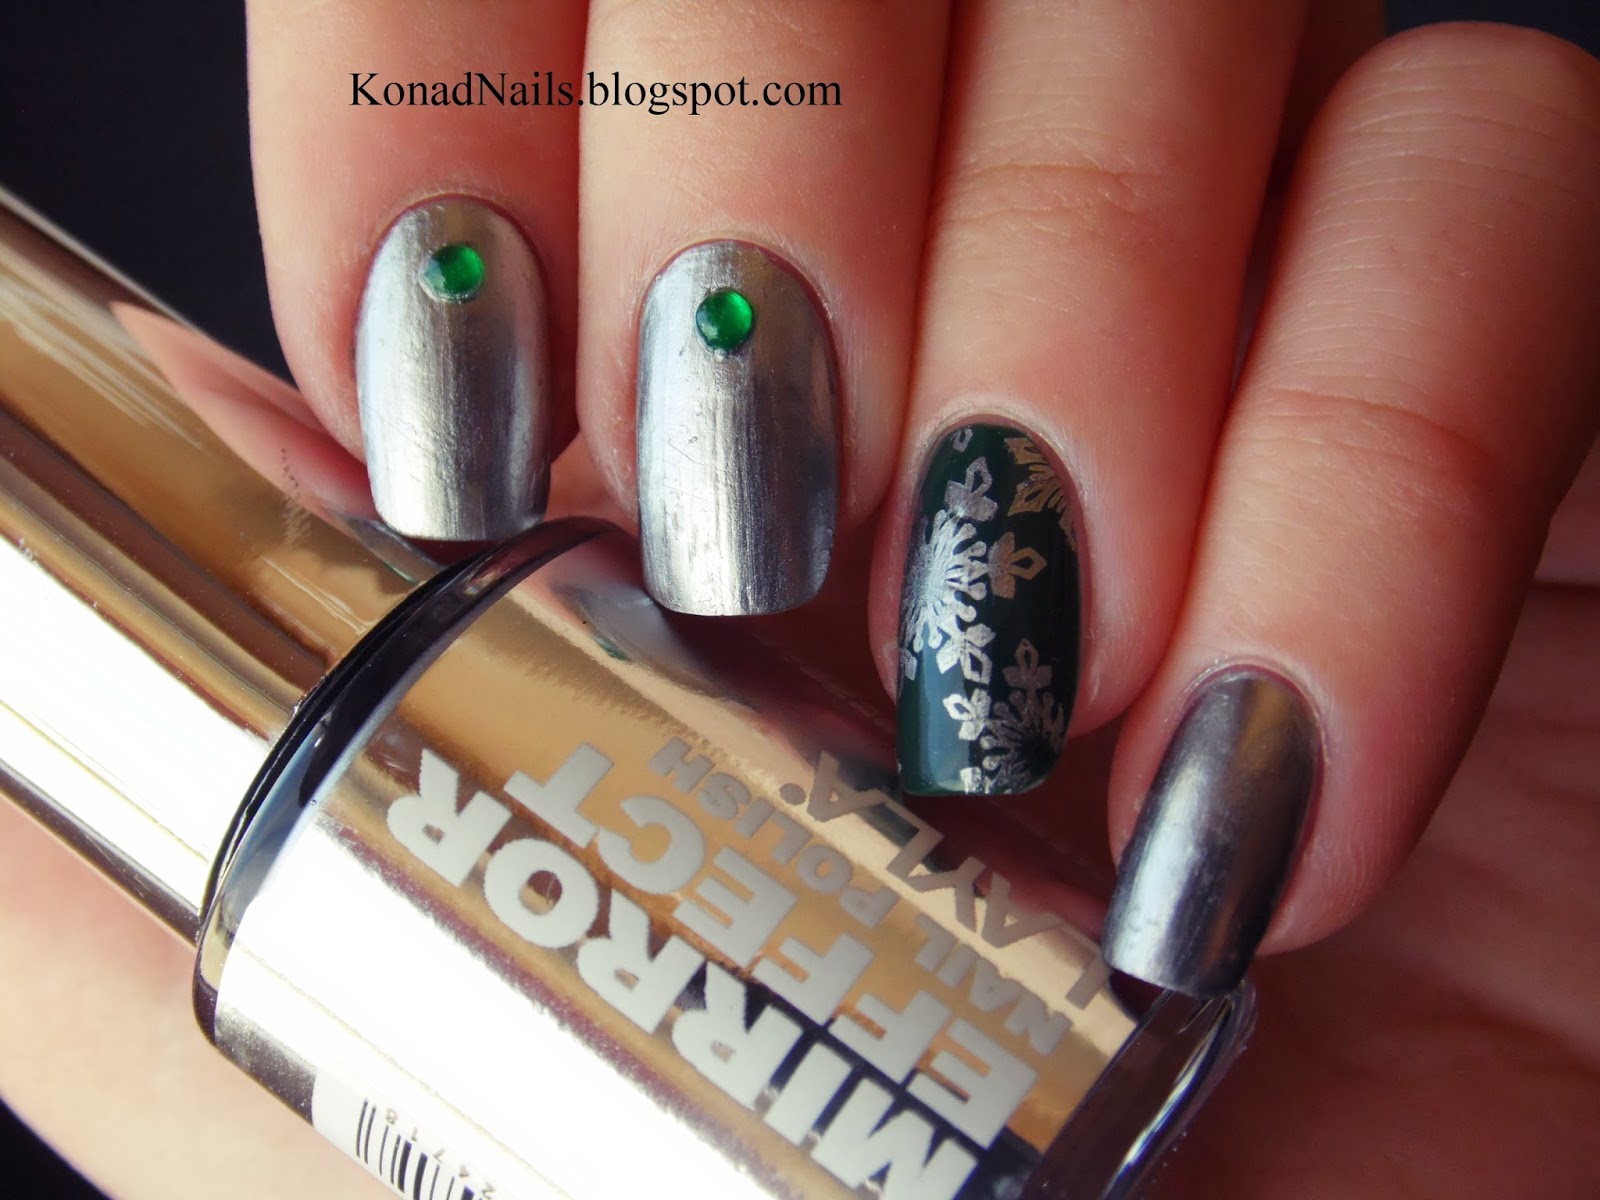
For this manicure, I started with two coats of Layla Mirror Effect -01 Metal Chrome on all nails except from my ring finger's, where I applied Illamasqua -Vince. On the accent nail, I stamped the snowflakes design from Bundle Monster's BM-H02 image plate and finished with clear top coat. I also added some green rhinestones on my pointer and middle finger. What do you think?
I cannot wait to show you the rest of the manicures I'm going to prepare for this challenge!

Instagram

You can see all the manicures created by other participants here.

Wednesday, 30 October 2013

Mummy nails for Halloween

Hi,
Today I'll show you the design I'll be wearing for Halloween: Mummy nails.


I started with two coats of Flormar -M01 and then I stamped the design from Cheeky Beauty's GA15 stamping plate using black nail polish. Using a nail art brush, I created a thicker black line and then made two red dots using a dotting tool and Illamasqua -Alarm. I finished with clear top coat. What do you think? 

Saturday, 26 October 2013

T.P.A. Group Challenge: 9. Inspired by your favorite quote

Hi,
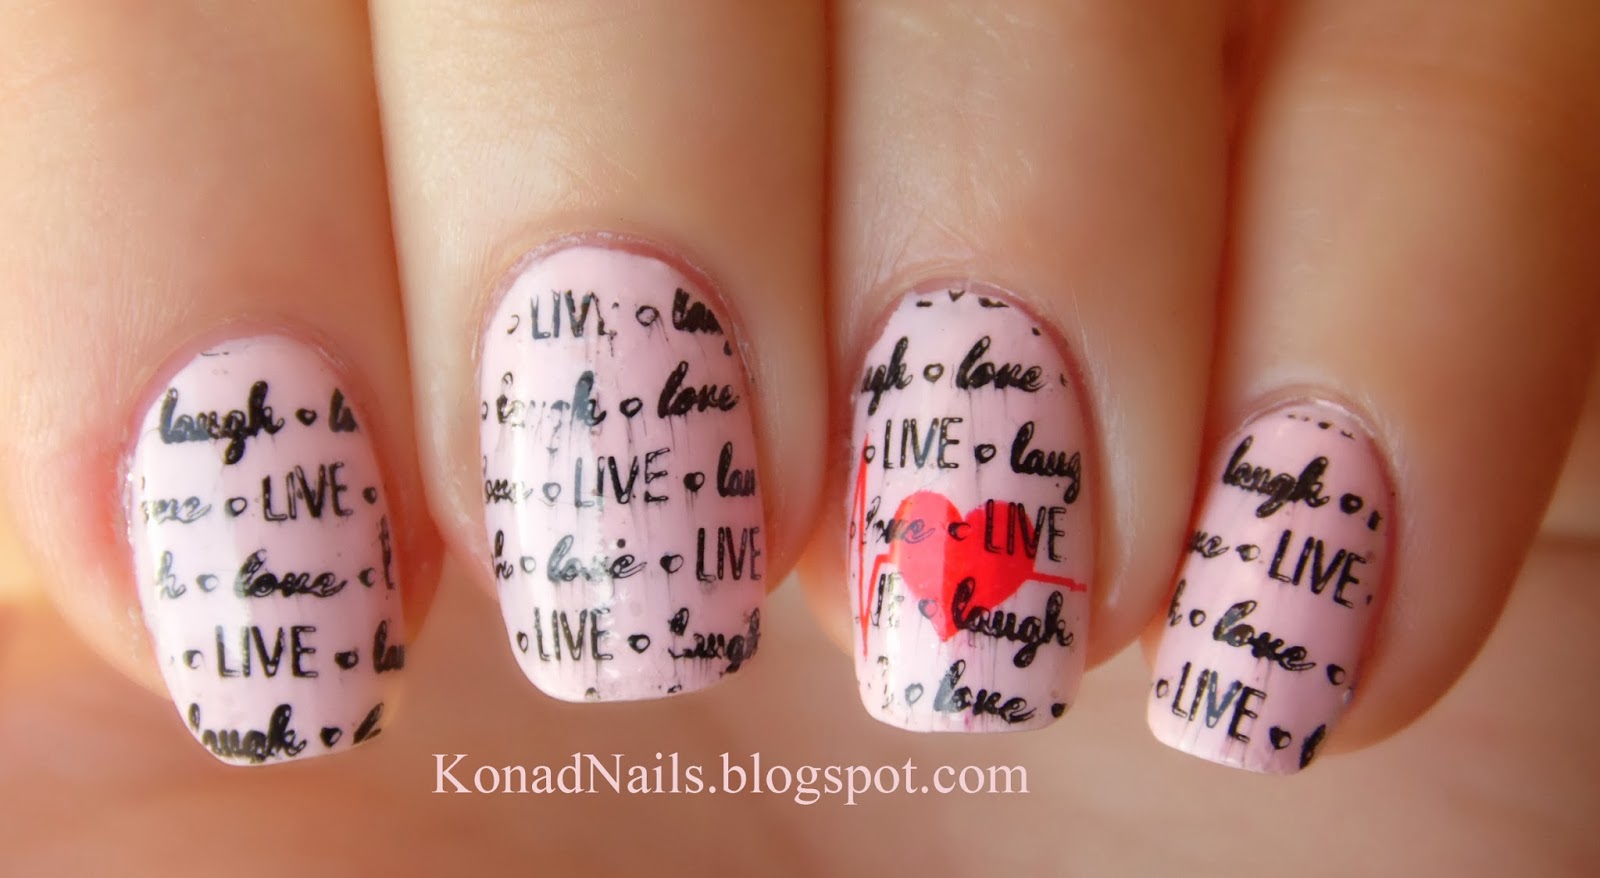
Today I'll show you my 9th manicure in the T.P.A. Group Challenge. This one should have been inspired by my favourite quote and I didn't hesitate. Bundle Monster's 2013 plates set include the text of my favourite quote, which is Live. Laugh. Love. 

I started with two coats of Avon -Pearl Pink and then I stamped the design from BM-405 plate using black nail polish. on the accent nail, I stamped the heart design from BM-411 plate using Illamasqua -Alarm. I finished with clear top coat. What do you think?

Here are the other girls who participated in this challenge:
1. Oana - http://wanna-nails.blogspot.com
2. Andra (Sophie) - http://sophiesnailartdreamland.blogspot.ro
3. Madalina - http://misshappyandhernails.blogspot.ro
4. Rita - http://addictedofbutterflies.wordpress.com
5. Maria (Konad Addict) - http://KonadNails.blogspot.com
6. Roxy (Beautylicious) - http://roxy-ch.blogspot.ro
7. Mihaela - http://lacquerbuzz.com
8. Iulia - http://iuliabeldean.blogspot.ro

Monday, 23 September 2013

MIYO Nail Polish #28 & Shimmer Polish -Liana

Hi,
Today I'll show you my new polish from MIYO. In the pictures, I wear two coats of #28, without any clear top coat above. I actually got this from a local online store, Magiq. 

Buna,
Astazi va voi arata noua mea oja de la MIYO. In poze e nuanta #28, aplicata in doua straturi, fara top coat transparent deasupra.  

Cititoarele din Romania pot cumpara aceasta oja online, de pe Magiq. Site-ul este foarte serios, sunt foarte prompti, iar mai nou, stadiul coletelelor ce trimise prin Posta Romana poate fi urmarit online (un fel de Track&Trace). Tot acolo puteti gasi si oje marca Pierre Rene, inclusiv ojele din colectia Sand Effects.

I applied some striping tape and then created the two three coloured design. The darker green is Illamasqua -Kink and the glitter polish is Shimmer Polish -Liana. Between two colours, I stamped a straight line from Cheeky Beauty's GA4 stamping plate, using Super Star -SoHo Chic. I finished with clear top coat. What do you think?

Am aplicat niste benzi subtiri (striping tape) pentru a crea modelul in trei culori. Verdele mai inchis este Illamasqua -Kink, iar glitterul este Shimmer Polish -Liana. Intre doua culori, am stampilat o linie dreapta de pe placuta GA4 de la Cheeky Beauty, folosind oja Super Star -SoHo Chic. Am terminat cu un top coat transparent. Ce parere aveti?

Here's the beautiful Liana. Aceasta este frumoasa Liana.

You can find Shimmer Polish glitters online, on Etsy. A 0.5 Fl. Oz. bottle costs $12 and they can be shipped worldwide. Puteti gasi ojele cu glitter Shimmer Polish online, pe Etsy. O sticluta 0.4 Fl. Oz. costa 12 dolari si pot fi trimise si spre Romania. 

Saturday, 14 September 2013

T.P.A. Group Challenge: 3. Inspired by your zodiac sign - Cancer

Hi,
Today I'll show you the third themed manicure in the T.P.A. Group Challenge. The Cancer, my zodiac sign inpired me for this manicure and so I decided to create the beach nail art below.

I started with two coats of March Nail Lacquer #1 from Born Pretty and then I Applied a coat of BB Cream Boutique -02 Sparkling Red (actually, the polish is gold) on the tips. Then I applied a coat of  Shimmer Polish -Tracy over the gold layer. On my index finger, I stamped the palm tree design from m29 Konad plate using black polish, and then, using a really small dotting tool, I added some green polish to complete the design. On the rest of my nails, I created the cancer design. I used B23 stamping plate from KKcenterhk, which is the equivalent of m33 Konad plate. Following this tutorial, I created the little, outlined crabs. The red I used was Illamasqua -Alarm.I added some small details and finished my manicure with clear top coat. What do you think?


Thursday, 22 August 2013

Fish skeleton nail art

Hi,
Today I'll show you my new manicure with QA62 image plate from Born Pretty. I started with two coats of Illamasqua -Kink and then I stamped the designs on the plate using SuperStar -SoHo Chic. On my accent nail, I surrounded the big skeleton with glitter nail polish. On my right hand's ring finger, I applied the same polish I used for stamping using a sponge. On my left hand's ring finger, I used silver glitter polish. I finished with clear top coat on all nails. What do you think?

Tuesday, 30 July 2013

Neon summer splatter & gradient manicure

Hi,
Today I'll show you my perfect-for-summer neon manicure. I started with two coats of Illamasqua -Scorch on all nails except from my thumb, on which I applied Zoya -Jolene. On my index and middle finger I applied spots of nail polish using the splatter technique. For the ring finger and pinky, I created a gradient of neon yellow and neon peach. Yes - there are only two colours there ( China Glaze -Sun of a peach and Chissa #255)! On my thumb, I firstly appied two big, white dots using a dotting tool and once they were dry, I applied the yellow and the peach colour above. I finished with clear top coat on all nails. What do you think?


Also, today's the 3 year blog anniversary! Yaaaaaay! Thank you everyone for followings as well as for commenting all my posts! I do appreciate your support :)

Friday, 19 July 2013

Navy manicure

Hi,
Today I'll show you another summer inspired manicure idea: navy nails. I started with two coats of Illamasqua -Scorch on all nails, except my thumb and pinky on which I applied two coats of Astor #070. I stamped the stripes from Cheeky Beauty's GA21 plate. On my middle finger, I also applied some more blue on the tip using a sponge and stamped afterwards the anchor design from QA5 image plate. You can find this plate online, at Born Pretty store. On my ring finger I stamped the helm from the same image plate, using red nail polish. Lastly, I applied two square rhinestones on my pinky. I finished with clear top coat on all nails. What do you think?

Saturday, 13 July 2013

Fish manicure

Hi,
Today I'll show you my fish manicure to fit my seaside holiday. I started with a coat of Illamasqua -Scorch (white) as a base colour for the gradient. On a sponge, I applied  Chissa #255 (the light, neon green) and Miss Sporty #346 (the darker green) so as to create the gradient. Over it, I applied a coat of Farmasi Shimmer Nail Enamel #201. Then, using black nail polish, I stamped the fish and the seahorse from m27 Konad plate. I finished with clear top coat. What do you think?

Friday, 5 July 2013

China Glaze -Sun of a peach

Hi,
Today I'll show you my peach manicure I created using China Glaze -Sun of a peach from the 2013 Sunsational collection. This is a neon shade which I absolutely adore and I think I'll wear it a lot this summer. I applied three coats of it on my thumb, index and middle fingers. On the rest of the nails, I applied two coats of Illamasqua -Scorch and then I stamped the design from m64 Konad plate using black polish. Using a dotting tool, I applied some peachy dots. I finished with clear top coat on all my nails. My inspiration for this manicure was Katiee's Beauty World's manicure. What do you think?

Friday, 21 June 2013

Crackle manicure

Hi,
Today I'll show you my summery crackled manicure. I started with a coat of Illamasqua -Scorch, a white base for the gradient. Using the sponge technique, I applied Picture Polish -Hot lips, Sinful Colors -Courtney orange and Illamasqua -Nomad. Then I applied my Cracking top coat from Born Pretty. Finally, I added a clear top coat. What do you think?

Sunday, 2 June 2013

Chocolate Sauce & Sprinkles Nail Art

Buna,
Astazi va voi arata o manichiura pe care o puteti realiza foarte usor cu mana libera. Oja de baza folosita este de la Avon, nuanta Pink Pearl. Pentru a afla mai multe despre produsele lor, vizitati Avon Space. Cu ajutorul unui dotting tool am creat efectul de sos de ciocolata, oja folosita fiind Illamasqua -Taint.

Hi,
Today I'll show you a really easy to do freehand manicure. I started with two coats of Avon -Pink Pearl and then, using a dotting tool I created the chocolate 'sauce' on the nails. The nail polish used was Illamasqua -Taint.
Avon -Pink Pearl
Am urmat pasii din videoclipul de mai jos pentru a realiza manichiura. 
I followed the steps below to get this look.

Ce parere aveti? What do you think?
Free counters!