Friday 29 September 2017

Tresemme Diamante Review

Autumn is here, so my hair needs some extra care than usual.That's because when it gets colder outside my hair starts electrifying like crazy and I have to be very careful what products I use. Usually I manage to keep it under control with a hail balm or a good mask. So I'm always in search of a new hair balm, maybe because my hair gets used really fast with the products or because I haven't found yet the balm that I'm 100% satisfied with. 

A venit toamna, asa ca parul meu are nevoie de putin mai multa ingrijire ca de obicei. Asta pentru ca atunci cand se raceste afara parul meu incepe sa se electrizeze groaznic si trebuie sa fiu foarte atenta cu ce produse folosesc. De obicei reusesc sa il tin sub control cu un balsam sau cu o masca buna. Mereu sunt in cautarea unui balsam nou, poate pentru ca parul meu se obisnuieste foarte repede cu produsele sau poate pentru ca nu am gasit pana acum balsamul de care sa fiu multumita 100%. 


I've recently discovered the Tresemme Diamante hair balm and decided to give it a try. I think that the ratio between quality and price is excellent as the balm comes in a 675 ml container which means that I will be able to use it for the next few months. I was very excited about it as I've never tried any shampoo/hair balm/hair mask from Tresemme yet and I've only heard good things about it.

Recent am descoperit site-ul Triodeluxe si m-am hotarat sa incerc balsamul Tresemme Diamante, pe care il puteti gasi aici. Mi se pare un raport calitate-pret excelent: balsamul costa 39 de lei si este intr-un recipient de 675 ml, ceea ce inseamna ca o sa ma tina cateva luni bune. Eram foarte entuziasmata deoarece nu am incercat pana acum niciun sampon/balsam/masca de la Tresemme, dar am auzit numai lucruri bune.

What they say: It has a formula that repairs 2 years old hair trauma after only 5 uses, resulting a stronger and easier to comb hair.  
I really started to see a difference after a few uses. My hair is softer, silkyer, it combs easy although I can't say I had serious combing problems and most importantly for me in this period, it doesn't electrify. I need a small quantity for the whole length of my hair so I think that I'll be able to enjoy it for at least 4-5 months. I'm really excited about it and I think that it was worth buying it. I'd like to know if you've tried it or if you've tried other products from Tresemme and what's your opinion about them!

Ce spun ei: Are o formula care repara daunele vechi de pana la 2 ani dupa numai 5 utilizari, rezultand un par mai puternic, mai usor de pieptanat. 
 Intr-adevar, dupa cateva utilizari am observat o imbunatatire vizibila. Parul este mai moale, mai matasos, se piaptana usor, desi nu pot spune ca am avut vreodata probleme serioase cu pieptanarea lui si cel mai important pentru mine in aceasta perioada, nu se electrizeaza. Am nevoie de o cantitate mica pentru toata lungimea parului si cred ca o sa ma bucur de acest balsam pentru cel putin 4-5 luni. Eu sunt foarte incantata de el si consider ca a fost o investitie buna. Mi-ar placea sa stiu daca l-ati incercat si voi sau daca ati incercat alte produse de la Tresemme si care este parerea voastra despre ele!


Follow me on:

Thursday 28 September 2017

Sweater weather nails

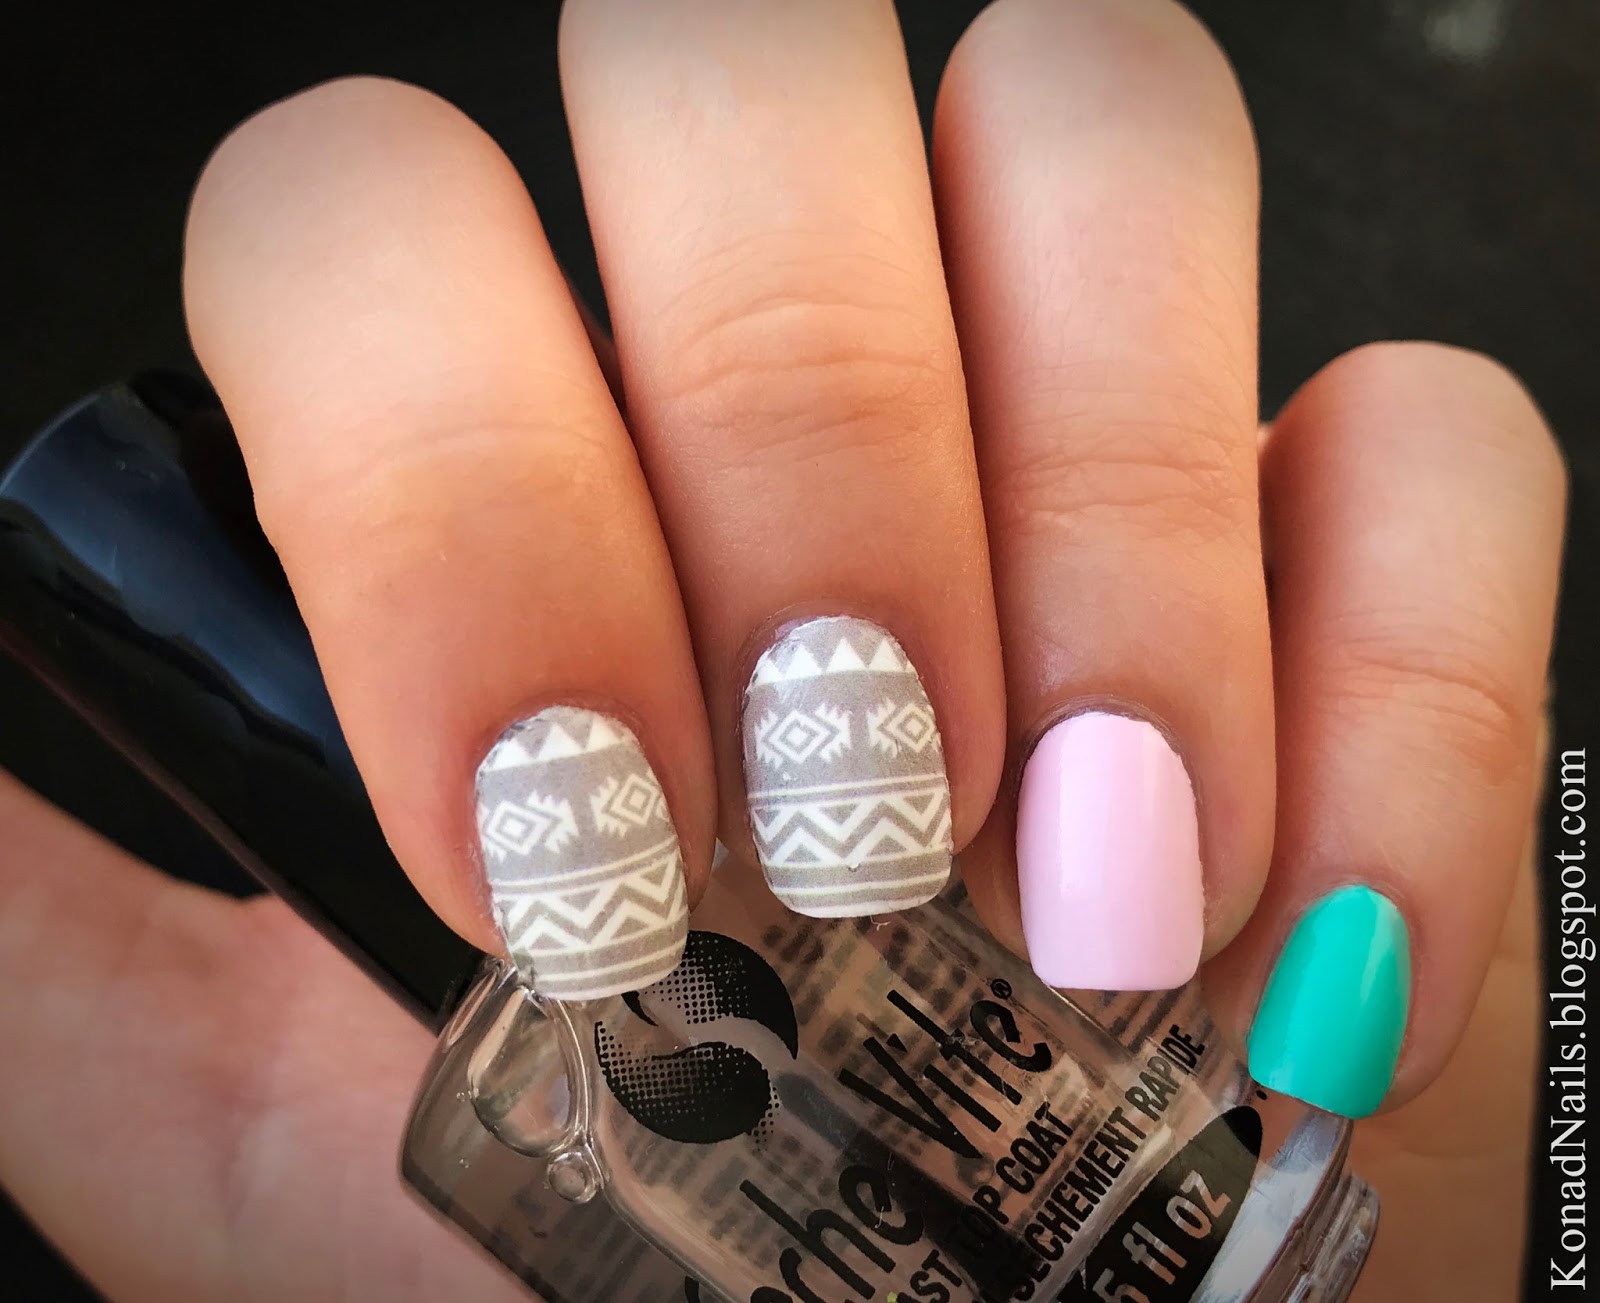
As the swater weather seems to slowly install, I started wishing for darker colours on my nails and sweater prints. So I decided to recreate another houndstooth nail art. I discovered I have another plate with this design, so this time I used BM-322 from Bundle Monster. I showed you last week my red houndstooth manicure that I created with m63 stamping plate for Konad and you can see it here. As you can see, they're not identical - the one from Bundle Monster is wider and the spaces between the checks are bigger. 
As a base colour for this manicure I used two coats of No7 - Totally Teal. I stamped the designs with black and white stamping nail polish from Born Pretty store. I finished everything with Seche Vite top coat for some extra shine and resistance.
What do you think? I'd like to know which houndstooth pattern you like more, this one or the one from last week? I honestly prefer the one from Konad pmore. 


Follow me on:

Wednesday 20 September 2017

Houndstooth nail art

Hi,
Do you remember houndstooth? It feels like it's been such a long time since this pattern was a trend! So I went back in my blog archive and looked for the last houndstooth nail art I've created. It was in 2012 and you can see it here. It is so beautiful, I have no idea why everyone seems to have forgotten about it. That made me nostalgic... Please tell me, am I the only one who misses houndstooth? I plan to wear it again in another combination, I was thinking about dark green and black. 
For this manicure I used Makeup Gallery - Pillar Box Red on all nails except from my accent nail, where I applied two coats of Madam Glam - Snow White. I stamped the houndstooth design from Komad's m63 image plate using black stamping polish from Born Pretty. I finished with Seche Vite top coat for a perfectly sealed design and some extra shine.What do you think?

Follow me on:

Tuesday 19 September 2017

My nail care routine - Rutina mea de ingrijire a unghiilor

Hi,
Many of you have asked, so today I'll show you my simple nail care routine that keeps my nails healthy and strong. I think this is something that everyone wishes for and it's easy to accomplish if you try to always follow some simple steps. I'm not saying that my nail care routine is the best and you should do it like me, but try to create one that suits you and stick to it. 

I always start by removing any nail polish I had on my nails with the blue nail polish remover from Cien (you can find it in the Lidl supermarkets). I've tried a lot of nail polish removers and this one is my all time favourite. It easily removes any kind of nail polish without much effort and it's also very good at removing stamping polish and cleaning the stamping plates, stamper and scrapper. This is the most important thing for me, as most of the nail polish removers are ineffective at removing stamping polish and just create a huge mess. Not this one.

Next step is to hydrate my nails with the Tender Care protecting balm from Oriflame. I sometimes use other nail oils instead of this product. I like to leave my nails like that for a few hours, without any nail polish, just letting them breathe. Also, it's important that you're nails are not oily before proceeding to the next step, as the nail polish will chip faster if you apply it on a greasy base. 

Then I apply Mavala Scientifique Nail Hardener, a product I started using about 5 years ago and never stopped since. This product must be applied only on the tips and it gives them strength. I started using it a few years ago when I had serious problems with my nails. They were very weak and would break immediately. I was desperate to find something to really strengthen them and read about this product on the internet and decided to give it a try. I don't know its price know, but I remember that back then it was pretty expensive. I must say that it was the best investition I've ever made. My nails stoped breaking and became  stronger than ever. You use a really small amount of product for all ten nails because it's liquid. I have the same bottle I bought 5 years ago and still have more than half product in it even though I use it once or twice every week.

I always apply base coat before applying nail polish. The one I have now is 9 in 1 base coat from Melkior but I don't always use the same one. I buy what I feel like trying at that very moment. I was also very satisfied with 8 in 1 from Eveline and Nail Shield from Oriflame. The most important thing for me is to protect my nails from coloured nail polish stains as the Mavala Nail Hardner does most part of the the job. 


Buna, 
Multe dintre voi mi-ati cerut asta, asa ca astazi va voi arata rutina mea simpla de ingrijire a unghiilor ce ma ajuta sa le mentin sanatoase si puternice. Cred ca asta este ceva ce ne dorim toate si este usor sa le obtinem daca incercam sa urmam mereu niste pasi simpli. Nu spun ca ce fac eu este cel mai bine sau ca ar trebui sa faceti si voi la fel, dar incercati sa creati o rutina de ingrijire a unghiilor care vi se potriveste si tineti-va de ea.

Intotdeauna incep prin a sterge oja ce o aveam pe unghii cu Dizolvantul de unghii albastru de la Cien (se gaseste in supermarketurile Lidl). Am incercat o multime de dizolvante pentru unghii pana acum dar acesta este preferatul meu. Indeparteaza usor orice tip de oja fara prea mult efort si este foarte eficient in indepartarea ojei pentru stampilat si pentru curatarea placutelor, a stampilei si a scrapperului. Acesta este cel mai important lucru pentru mine, deoarece majoritatea dizolvantelor nu sunt eficiente cu oja pentru stampilat si doar fac o mare mizerie. Nu si acesta. 

Urmatorul pas este sa-mi hidratez unghiile cu Balsamul multifunctional Tender Care de la Oriflame (cunoscuta "cutiuta cu minuni"). Cateodata folosesc si alte uleiuri pentru unghii in locul acestui produs. Imi place sa imi las unghiile asa pentru cateva ore, fara sa aplic vreo oja, doar sa le las sa respire. De asemenea, este important ca unghiile sa nu fie uleioase inainte de a trece la pasul urmator, deoarece oja se va coji mai repede daca o aplicati pe o baza grasa.

Apoi aplic Scientifique Nail Hardener de la Mavala, un produs pe care am inceput sa il folosesc acum aproximativ 5 ani si nu m-am mai oprit de atunci. Am inceput sa il folosesc in urma cu cativa ani cand aveam probleme mari cu unghiile. Erau foarte fragile si se rupeau imediat. Eram disperata sa gasesc ceva ce sa le intareasca intr-adevar si am citit despre acest produs pe internet si am decis sa ii dau o sansa. Nu stiu care este pretul lui acum, dar imi amintesc ca atunci a costat destul de mult. Trebuie sa spun ca a fost cea mai buna investitie pe care o puteam face. Unghiile mele nu s-au mai rupt si au devenit mai tari ca niciodata. Ai nevoie de o cantitate foarte mica de produs pentru toate cele 10 unghii pentru ca are o consistenta lichida. Am si acum aceeasi sticluta pe care am cumparat-o acum 5 ani si mai am inca mai mult de jumatate de produs in ea, desi il folosesc o data sau de doua ori pe saptamana.

Intotdeauna aplic o baza pentru unghii inainte sa ma dau cu oja colorata. Cea pe care o am acum este Baza pentru unghii 9 in 1 din noua colectie Melkior, pe care o puteti gasi aici pe site-ul lor. Nu folosesc mereu aceeasi baza. De obicei cumpar ce ma atrage pe moment, dar am fost foarte satisfacuta si de baza 8 in 1 de la Eveline si de Nail Shield de la Oriflame. Cel mai important pentru mine este sa-mi protejez unghiile de petele lasate de ojele colorate, deoarece Nail Hardner-ul de la Mavala face toata treaba. 


And this is how my naked nails look like after spoiling them with all these products. What do you think? I'd love to hear about your nail care routine, too!

Si asa arata unghiile mele "goale" dupa ce le rasfat cu toate aceste produse. Ce parere aveti? Mi-ar placea sa aud mai multe si despre rutina voastra de ingrijire a unghiilor!

If you'd like to read about my face care routine, click here.
Daca v-ar placea sa cititi despre rutina mea de ingrijire a fetei, dati click aici.

Follow me on:

Sunday 17 September 2017

Ethnic nails

Hi, 
Today I'll show you my new ethnic manicure I easily created using some water decals from Born Pretty store. I started with a coat of white nail polish as a base for the nails where I was going to apply the decals. The nail polished I used on the rest of the nails were El Corazon - Matte Effect 111 (pink) and China Glaze - Too Yacht to Handle (green). If you aren't familiar with water decals, they're really easy to use and they're great for quick manicures. Firstly you have to remove the protection foil from the sheet and then cut smaller pieces containing the designs you're going to use. Next, sink them in a small bowl with water for about 30 seconds. When you take them from the water, you'll notice that de design will easily come off the sheet and you'll be able to stick it on the nail. You'll just have to be very careful as it's really thin and can easily fold by mistake. If you're using them for the first time, just take a little time and pay some extra attention. After a few uses, you'll find them really easy to utilise. I finished my manicure with clear top coat on all nails. What do you think?

Follow me on:

Friday 15 September 2017

Melkior New Collection Storytelling

Hi,
Today I'll show you my new simple, purple and eye-catchy manicure that stands out not only because of the accent nail, but also because of the beautiful nail polish colour. I used Melkior - Purpur, a shade from their new collection Storytelling. All their new colours are great but I think this one is my favourite. I was really surprised by this nail polish in a good way. I didn't expect much from it when seeing it the first time in the bottle as it has shimmer in it and usually this kind of nail polishes need 4-5 coats to become opaque and look decent on the nails. It wasn't like that at all, as the nail polish was perfectly opaque after the first coat. It's the first time when I wear Melkior nail polishes but I already like them for three reasons: the colours are opaque, they dry fast and the brush is large enough to cover almost the whole nail, so that the application is very easy. 
On the accent nail I applied a coat of Madam Glam - Snow white, another nail polish that is perfectly opaque after a single coat. Then I applied some water decals from Born Pretty. So that's it, in just a few minutes I created an amazing manicure. I finished with Seche Vite top coat for extra shine and resistance. What do you think?

Buna,
Astazi o sa va arat o noua manichiura simpla, mov ce iese in evidenta atat prin unghia accent, cat si prin culoarea superba a ojei. Pentru aceasta manichiura am folosit nuanta Purpur de la Melkior. Face parte din noua colectie "Storytelling" care a fost lansata de curand. Toate culorile noi sunt superbe, dar cred ca aceasta este preferata mea. Trebuie sa recunosc ca m-a surprins in mod placut. Cand am vazut prima data culoarea in sticluta nu ma asteptam la cine stie ce. Asta pentru ca are in ea putin shimmer si parea genul acela de oja pe care trebuie sa o aplici in 4-5 straturi pentru a fi opaca si pentru a arata decent pe unghii. Nu a fost deloc asa si mare a fost surpriza sa vad ca era perfect opaca dupa un singur strat. Este prima data cand incerc produsele de unghii de la Melkior, dar pana acum imi plac foarte mult din trei motive: culorile sunt opace, se usuca foarte repede si pensula este destul de lata incat sa acopere aproape in intregime unghia, astfel ca aplicarea este floare la ureche. 
Desigur, inainte sa aplic oja am folosit noua baza pentru unghii 9 in 1 tot de la Melkior, despre care v-am povestit aici si v-am prezentat toate cele 9 beneficii. 
Pe unghia accent am aplicat un strat de oja alba Madam Glam - Snow white, o alta oja care este perfect opaca dupa un singur strat. Apoi am aplicat niste water decals de la Born Pretty. Totul a mers foarte repede, astfel ca in cateva minute am realizat o manichiura de efect. Am terminat cu un strat de Seche Vite top coat pentru a oferi rezistenta si stralucire. Ce parere aveti?

Toate ojele din noua colectie se gasesc in cele 2 variante de sticlute, de 15ml si de 4,5ml. Descopera acum nuanta care iti pune in evidenta manichiura, aici! Sunt oje rezistente care asigura o acoperire foarte buna si uscare rapida. 

Doar astazi puteti profita de oferta 1+1 cadou la oje si transport gratuit la comenzile de peste 49 lei. Cei de la Melkior au aproape in fiecare zi o noua oferta/reducere/promotie, asa ca daca va abonati la newsletterul lor veti fi mereu la curent. In plus, primiti un cod de reducere de 20% la prima comanda daca va abonati.

Follow me on:

Tuesday 12 September 2017

Noua baza pentru unghii de la Melkior

Daca sunteti cat de putin pasionate de manichiura sau obisnuiti sa va faceti unghiile singure cel putin o data pe saptamana, inseamna ca stiti deja cat este de importanta baza. Este primul pas spre o manichiura care rezista. Astazi o sa va prezint noua baza pentru unghii de la Melkior, care pe mine m-a atras de la inceput. Este vorba despre un produs 9 in 1 care vine in ajutorul nostru.

Ceea ce mi se pare si mai interesant esta ca cei de la Melkior au creat sticlute in forma ergonomica, cu sistem de auto-curatare a sticlei si capac anti-alunecare. Suna foarte bine, nu? De asemenea, sunt prevazute cu pensula lata pentru aplicare rapida.

Iata care sunt cele 9 proprietati ale acestui produs miraculos:
1.       Este baza protectoare pentru unghii.
2.       Albeste si ilumineaza unghiile.
3.       Este o baza nivelanta pentru unghii.
4.       Are rolul de a intari unghiile.
5.       Accelereaza cresterea unghiilor.
6.       Se absoarbe foarte repede in unghie.
7.       Asigura cresterea aderentei lacului de unghii.
8.       Prelungeste rezistenta lacului de unghii.
9.       Protejeaza unghia naturala de pigmentul puternic al lacului de unghii.
Toate aceste proprietati sunt posibile din cauza compozitiei din care nu lipsesc urmatoarele ingrediente:
·         Cheratina, arginina si uleiul de arbore de ceai – care au rolul de a accelera cresterea unghiei
·         Vitamina E – cu rol antioxidant
·         Vitamina C, B5 – pentru un plus de sanatate
·         Ulei de migdale – pentru netezire
·         Acid hialuronic – pentru revitalizarea unghiilor
Cum se utilizeaza Base Coat 9in1? E foarte simplu si la indemana oricui: se aplica 1 singur strat pe unghia naturala degresata in prealabil.

Fie ca folosesti oja sau nu, foloseste mereu Base Coat 9in1 pe unghiile tale! Este foarte important sa le mentii puternice, iar un strat in plus le intareste si le da rezistenta, astfel ca se vor rupe mai greu.

Follow me on:

Sunday 10 September 2017

Concurs pe pagina de facebook!

This post will be Romanian only as the contest is organised only for Romanian inhabitants.

Buna, fetelor! Va invit sa va inscrieti la concursul meu organizat pe pagina de Facebook. Va puteti inscrie aici. Gasiti toate regulile acolo. O singura persoana va castiga toate produsele din imagine. Printre ele se numara: 4 stamping plates de la MoYou London si Born Pretty, 2 folii cu water decals, 1 top coat UV de la Born Pretty care schimba culoarea ojei in functie de temperatura, 2 lacuri de unghii Tip Top Nails, un set de folie aurie, rhinestones si alte accesorii pentru unghii. Sper sa va placa. Mult succes!


Follow me on:

Stamping nail art created with stamping guide

Hi,
Today I'll show you another stamping manicure that is easy to create. I started with two coats of Rimmel - Out of the blue on all nails. Then, using Born Pretty's BPL-024 stamping plate and  the Stamping guide 003 I created the half moon stamped design. I finished with Seche Vite top coat on all nails. What do you think?

How to use the stamping guide
1. Choose any stamping plate that you like that has a full nail design. 
2. Paint it with stamping polish and scrap the excess.
3. Place the stamping guide with the desired template over the stamping plate. I chose the circled one.
4. Take your silicone stamper and stamp the design. 
5. Stamp it on the nail.

Follow me on:

Monday 4 September 2017

Mix & match manicure

Hi,
Today I'll show you a sweet mix & match manicure that I think is perfect for rainy days like these. I used El Corazon - Matte Effect 111 (pink) on my index fingers and pinkies and Glitter Gal - 3D Holographic nail polish on my thumbs and ring fingers. On my middle fingers I applied Madam Glam - Snow white as a base for the black dots that I created using a dotting tool. I finished with Seche Vite top coat on all nails. What do you think?
Follow me on:

Sunday 3 September 2017

Traveling nail art

Hi,
As you might already know from my travel blog, I've recently been in a city break in Belgium that you can read more about here and decided to create a travel themed manicure. For this one, I started with two coats of Rimmel - Too cool to tango and Madam Glam - Snow white as base colours for the stamping. Then, using black and white stamping polish from Born Pretty store, I stamped the clouds on my index finger from Konad m79 stamping plate and the plane, map, luggage and windmill from Born Pretty BP-124 stamping plate. I finished with Seche Vite clear top coat on all nails. What do you think?


Follow me on:

Free counters!