Showing posts with label Shimmer Polish. Show all posts

Saturday, 30 December 2017

New Year's Eve nail art

Hi,
Today I'll show you the manicure I'm going to wear for this New Year's Eve. I named them 'comet nails' as this golden sparkle placed in the middle of my nails reminds me of the tail of the comet. I started with two coats of Sephora - Black lace on all nails and then I took my nail sponge for the next steps. I applied the golden polishes using the edge of the sponge and tried to create a straight line in the center of my nails. Firstly, I applied Shimmer Polish - Tracy and then I applied Sephora by OPI - Come to Pappa-razzi. I also applied the second polish using a toothpick and concentrated on placing the glitter particles more to the center. I finished with Seche Vite top coat for some extra sparkle. What do you think about my comet?


Follow me on:

Wednesday, 26 July 2017

Precious blue

Hi,
Today I'll show you a blue mix and match manicure. As base colours, I used Rimmel - Too cool to tango and Rimmel - Sky high.On my thumb, index and middle fingers, I stamped the design from Born Pretty's BP-L003 stamping plate, using their white stamping nail polish. On my index finger, I added some Shimmer Polish - Jenny glitter and on my pinkie I added some rhinestones. I finished with clear top coat on all nails for extra shine. What do you think?

 Follow me on:

Monday, 19 September 2016

Peach mix & match

Hi,
Today I'll show you a new mix  & match manicure. I really like these because they are fast to do and also eye-catchy. I applied Rimmel - Peachella on my thumb, index and little fingers and Shimmer Polish - Carmen on my ring finger. On my middle finger, I started with a white base and then, using a thin brush, I created the animal print. I finished with clear top coat on all nails. What do you think?


Follow me on:

Friday, 31 July 2015

Mermaid nail art

Hi,
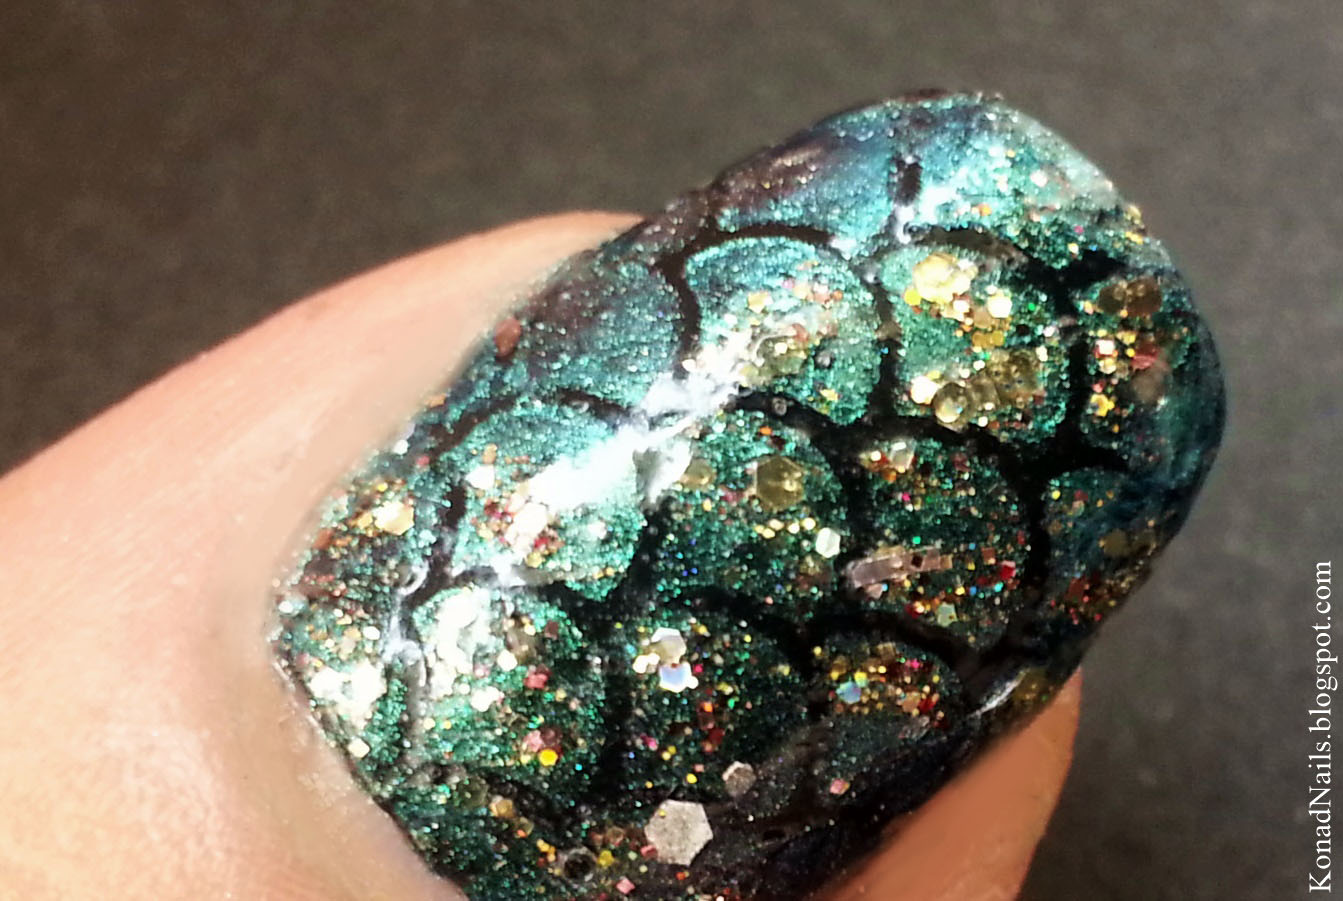
Today I'll show you my fish scale manicure which I easily created using the mermaid stencils from What's up nail art store. I started with a coat of Glitter Gal - Serpent black and then applied a coat of clear nail polish and let it dry. After placing the sencils, I applied Gosh - 540 Ocean and Shimmer Polish - Tracy using a sponge. Then, I removed the stencils and applied clear top coat. On my index and ring fingers, I applied some pearls and shell studs from Born Pretty store. I only fixed them on the nail using clear top coat. What do you think?

By the way, don't forget to use my 10% discount code MKAK31 with any order on Born Pretty store.

Also, click here if you'd like to see my mermaid nails from last year.


Follow me on:


Wednesday, 24 June 2015

Birthday nails

Hi,
Yesterday was my birthday so I created a festive and colourful manicure. I decided to mix chevrons, stripes, polka dots and a 3D ribbon and below you can see the result. The nail polishes used for this manicure were Rimmel - Sky High, Rimmel - Central Love Heart, Avon - Iceberg White and Shimmer Polish - Tracy. 

The 3D bow on my ring finger is from Born Pretty's 12 colours bowknot box . I only used top coat to stick it on the nail and it resisted very well.

What do you think?

Don't forget to use my 10% off coupon code MKAK31 with any order on Born Pretty store.


Follow me on:

Tuesday, 27 January 2015

Glittery nude

Hi,
Today I'll show you a very easy to do reverse moon manicure. I started with two coats of  Rimmel - Let's get nude and then applied clear top coat. Then I applied angle vinyls from Nails Redesigned and Shimmer Polish - Tracy using a sponge to maximize the glitter's effect. Finally, I removed the vinyls and applied another coat of clear nail polish. What do you think?


Follow me on:

Monday, 5 May 2014

Review: THE ONE by Oriflame

Buna,
In urma cu cateva zile v-am spus despre comunitatea internationala de bloggeri “THE ONE COLLECTIVE", in care m-am inscris si eu. Cateva zile mai tarziu, curierul mi-a facut o surpriza extrem de placuta, aducandu-mi un pachet substantial cu bunatati de la Oriflame. In pozele de mai jos puteti vedea produsele pe care le-am primit, atent asejate intr-o plasuta de cadou.

Pentru machiajul fetei: pudra Illuskin, corector si fond de ten cu SPF 20. Puterea de acoperire este mare in comparatie cu cea a altor produse de la ei, ceea ce m-a surprins in mod placut.

Pentru machiajul ochilor: trei farduri crema (de la stanga spre dreapta nuantele Golden Brown, Olive Green si Beige Pearl) si rimel pentru volum.

Pentru machiajul buzelor: doua luciuri de buze Power Shine in nuantele Trendy Berry si Rose Glacier. Pana acum am incercat doar rujurile Power Shine care imi plac foarte mult atat pentru stralucire cat si pentru puterea de hidratare. Nu stiu de ce nu mi-am facut curaj sa incerc si luciurile de buze, dar acum sunt convinsa ca sunt la fel de bune, avand aceleasi culori ce ies in evidenta intr-un mod placut si subtil.

Pentru machiajul unghiilor: oje ultra rezistente in nuantele Cappucino si Ni. Orchid.

Pentru manichiura de mai jos am folosit nuanta Ni. Orchid, aplicata in doua straturi. Apoi am creat un reversed french cu sclipiciurile Shimmer Polish -Tracy si SEPHORA by OPI -Come to Pappa-razzi!. In final, am aplicat un top coat transparent. Ce parere aveti?


In concluzie, sunt foarte incantata de toate produsele primite. Colectia 'The One' by Oriflame este cu siguranta un cadou ce nu trebuie refuzat de nicio femeie din Romania, oferindu-ne o gama variata de produse profesionale la preturi foarte accesibile. Puteti gasi mai multe detalii despre 
THE ONE pe site-ul Oriflame.
Le puteti gasi in fiecare catalog Oriflame, la preturi promotionale. Am atasat cate o fotografie cu nuantele disponibile si pretul fiecarui produs din catalog. Ojele se lasa inca asteptate - vor fi disponibile doare in cataloagele urmatoare. 

Ati incercat deja noile produse din colectia The One? 

Tuesday, 24 December 2013

Getting ready for Christmas Challenge: 8. The Christmas Red

Hi,
Today I'll show you The Christmas Red in the Getting ready for Christmas Challenge. I started with two coats of Dior #943 and then applied a coat of Shimmer Polish -Mary. The trees design is from Cheeky's Beauty GA27 and I stamped it using China Glaze -Passion. What do you think?

If you want to see all the girls' creations, don't forget to visit Elsa's blog, Like a candy shop

 You can find Shimmer Polish glitters online, on Etsy. A 0.5 Fl. Oz. bottle costs $12 and they ship polishes worldwide. 

Friday, 13 December 2013

Getting ready for Christmas Challenge: 4. Red and gold

Hi,
Today I'll show you the fourth manicure in the Getting ready for Christmas Challenge. 
Don't forget to visit Elsa's blog, Like a candy shop, to see all the manicures from this challenge.

For this one I used two coats of Astor -050 Iconic Red on all nails and then I stamped the globes design on my ring finger and pointer. This one is from BM-H03 image plate and I used China Glaze -Passion. On the rest of the nails, I applied a thick coat of Shimmer Polish -Tracy. I finished with clear top coat.

Perhaps you saw that I was holding something super cute and shiny in the first picture. It's my new necklace from Persunmall, which I fell in love with!

Shimmer Polish -Tracy  - you can find it online, on Etsy. A 0.5 Fl. Oz. bottle costs $12 and they can be shipped worldwide. 

Collar necklace - Persunmall ($7.99  - I see that now it is only available on silver, but that is beautiful, too!)


What do you think?

Wednesday, 4 December 2013

Getting ready for Christmas Challenge: 2. Glitter overload

Hi,
Today I'll show you the second manicure I prepared for the challenge which I participate in this winter. Elsa from Like a candy shop created this challenge and her idea was great!

This one was really easy to create, yet it is definitely eye-catching! I started with two coats of China Glaze -Too Yacht To Handle and then I applied Shimmer Polish -Wendy. I finished with clear top coat and that was it. What do you think?

Instagram
The stars of today's post were:
Shimmer Polish -Wendy *
China Glaze -Too Yaucht To Handle **

*You can find Shimmer Polish glitter nail polishes online, on Etsy. A 0.5 Fl. Oz. bottle costs $12 and they can be shipped worldwide. 

**Daca locuiti pe teritoriul Romaniei, puteti comanda aceasta oja China Glaze in exclusivitate de pe 
Beauty in the Bottle. De asemenea, ei aduc la comanda oje de la diferite firme care nu se gasesc in tara noastra, la preturi rezonabile.

Saturday, 12 October 2013

Bundle Monster 2013 "Create your own" nail stamping plates

Hi,
Today I'll show you the new 2013 "Create your own" nail stamping plates and my butterfly wings manicure.

This set contains 26 different stamping plates, unlike the previous ones which only contain 25. The designs on them were created by inventive fans and I have to admit that they had brilliant ideas. I'll live you with some pictures so you can make an idea.

For the manicure below, I started with two coats of Flormar -DC06 and then stamped the design from BM-424 plate using black polish. I filled in the dots using Shimmer Polish -Lucie. I finished with clear top coat. What do you think?

Visit Bundle Monster's website and like their facebook page if you want to find out more about their products. You may also want to follow them on twitterGoogle+ and Pinterest. They also sell their image plates on Amazon and eBay at reasonable prices and ship them worldwide. 
Free counters!